📘 WS2C - WiFi para Serial com 2 Canais
Vídeo Tutorial
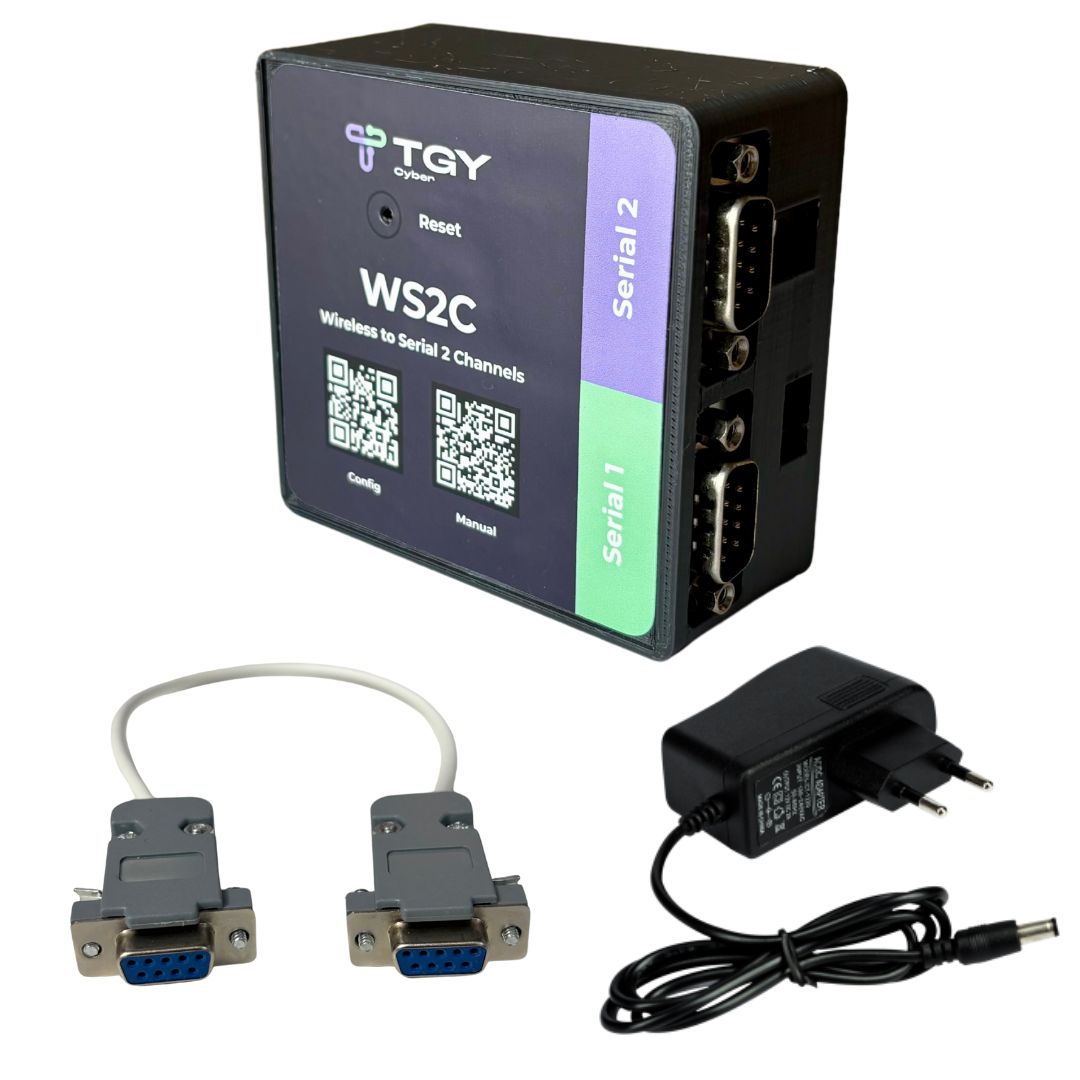
Conversor Serial RS232 para WiFi 2 Canais
1. Introdução
O WS2C é um conversor Wireless to Serial com duas portas seriais RS232, que permite conectar dispositivos seriais (como balanças, impressoras, microterminais, etc.) e realizar comunicação via Wi-Fi utilizando o protocolo TCP/IP, HTTP via API e MQTT.
Os dados recebidos da rede são transmitidos para a porta serial, e os dados enviados pela serial são transmitidos pela rede.

1.1 Instalação
Conecte o WS2C à uma fonte de alimentação com saída 9V 2A.
A fonte que acompanha o Kit WS2C opera em 127V ou 220V, e o dispositivo estará pronto para configuração e uso.
2. Webserver
O WS2C é configurado através de um webserver interno.
Para acessá-lo, basta conectar-se à rede criada pelo dispositivo e abrir o navegador.
2.1 Conectando-se à rede WS2C
- No seu computador ou celular, abra as configurações de Wi-Fi.
- Encontre a rede chamada “WS2C” (sem senha padrão).
- Conecte-se, o webserver já estará disponível para acesso.

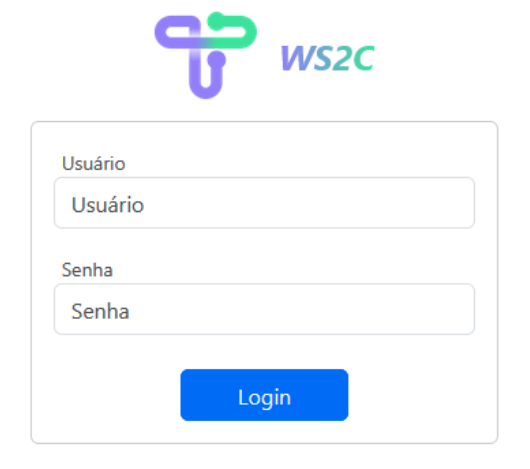
2.2 Acessando o webserver
Abra o navegador e digite o endereço:
http://10.10.10.10
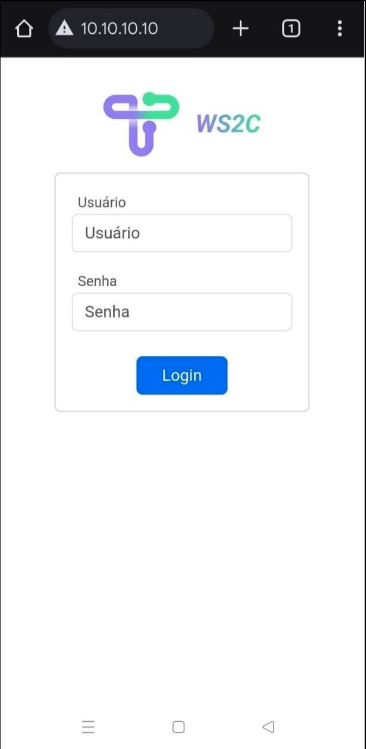
⚠️ Certifique-se de usar “http://” e não “https://”, pois o servidor não suporta HTTPS.
2.3 Realizando login no webserver
A tela de login exibirá os seguintes campos:
| Campo | Valor padrão |
|---|---|
| Usuário | admin |
| Senha | admin |
3. Configurando o dispositivo
O webserver possui cinco seções:
- Configuração do sistema
- Configuração da porta serial
- Configuração geral
- Visualização de status
- Configuração de protocolos
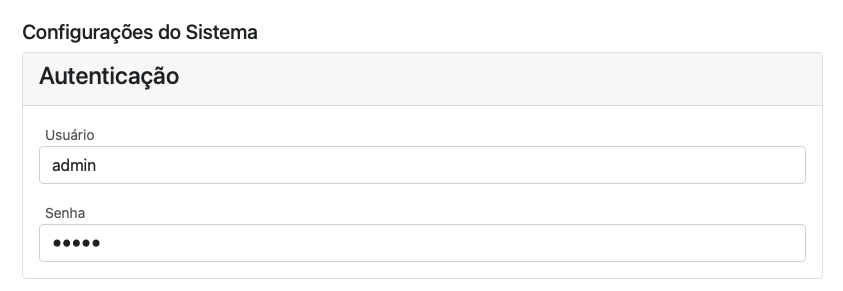
3.1 Configuração do sistema
Nesta seção é possível ajustar:
- Dados de autenticação (usuário e senha do webserver)
- Configurações de rede LAN (DHCP ou manual)
- Configurações de Wi-Fi (modo e canal)
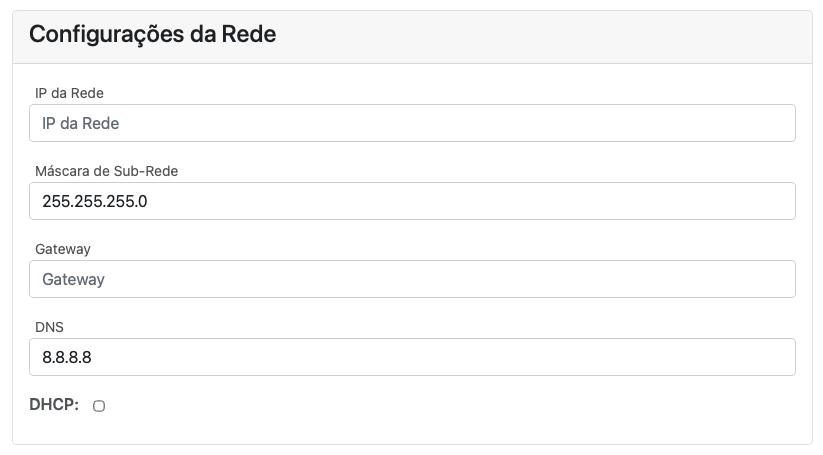
Configuração de LAN
| Campo | Descrição |
|---|---|
| IP de LAN | Endereço IP fixo (caso modo manual) |
| Máscara de sub-rede | Padrão: 255.255.255.0 |
| Gateway | Endereço do roteador |
| DNS | Padrão: 8.8.8.8 (Google) |
| DHCP | Pode ser ativado ou desativado |
⚠️ O modo DHCP desativado é recomendado para evitar troca de IP e perda de comunicação.
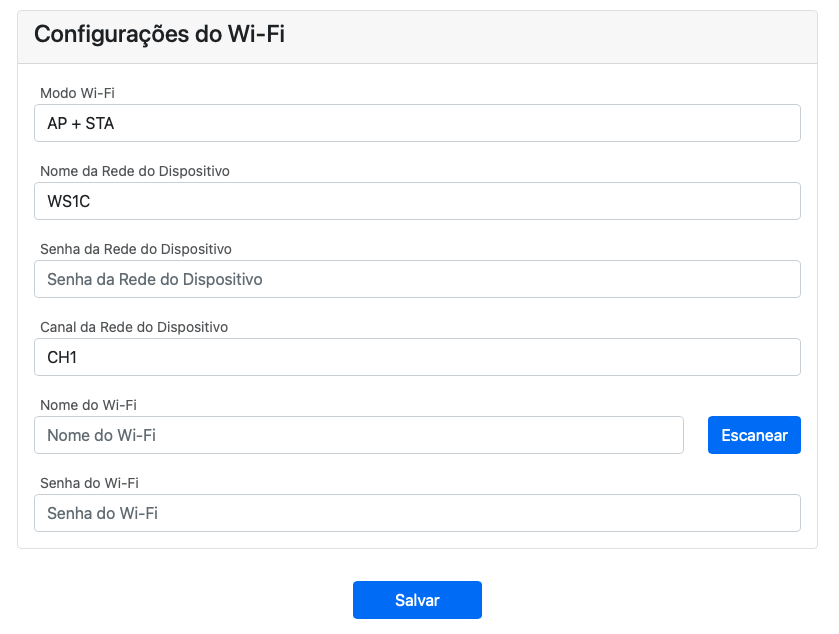
Configuração de Wi-Fi
| Campo | Descrição |
|---|---|
| Modo Wi-Fi | AP + STA, AP, ou STA |
| Nome da rede | SSID exibido na busca de Wi-Fi |
| Senha | Senha de conexão Wi-Fi |
| Canal | Padrão “1” ou valores entre 1 e 13 |
📶 AP (Access Point): Cria a rede WS2C para configuração.
📡 STA (Station): Conecta o WS2C à rede Wi-Fi local.
🔁 AP + STA: Permite configuração e operação simultâneas (recomendado).
| Canal | Frequência |
|---|---|
| 1 | 2.412 GHz |
| 2 | 2.417 GHz |
| 3 | 2.422 GHz |
| 4 | 2.427 GHz |
| 5 | 2.432 GHz |
| 6 | 2.437 GHz |
| 7 | 2.442 GHz |
| 8 | 2.447 GHz |
| 9 | 2.452 GHz |
| 10 | 2.457 GHz |
| 11 | 2.462 GHz |
| 12 | 2.467 GHz |
| 13 | 2.472 GHz |
3.2 Configuração da porta serial
O WS2C possui duas portas seriais independentes, configuráveis individualmente.
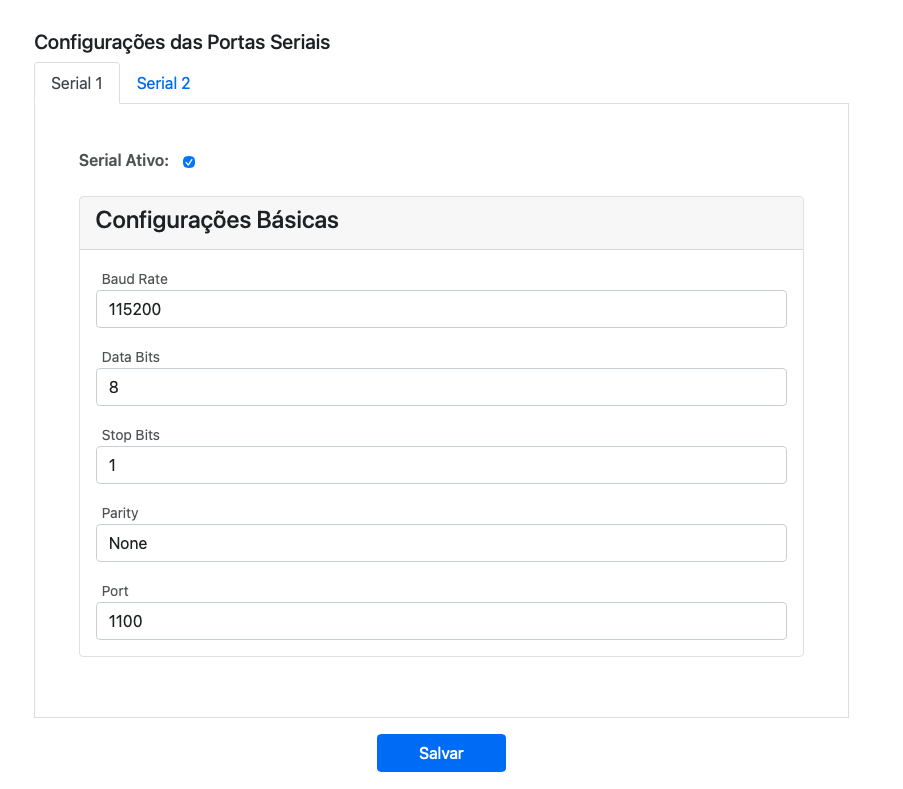
| Parâmetro | Descrição |
|---|---|
| Baud Rate | Velocidade de comunicação. Valores suportados: 1200, 2400, 4800, 9600, 19200, 38400, 57600, 115200, 250000, 921600 |
| Data Bits | Bits de dados |
| Stop Bits | Bits de parada |
| Parity | Tipo de paridade |
| Port | Porta TCP/IP associada à serial |
Por padrão:
- Serial 1 → Porta 1100
- Serial 2 → Porta 1101

⚠️ As portas não podem ser iguais.
Cada serial pode ser ativada ou desativada conforme necessidade.
3.3 Configuração geral
Nesta aba estão as opções básicas do sistema:
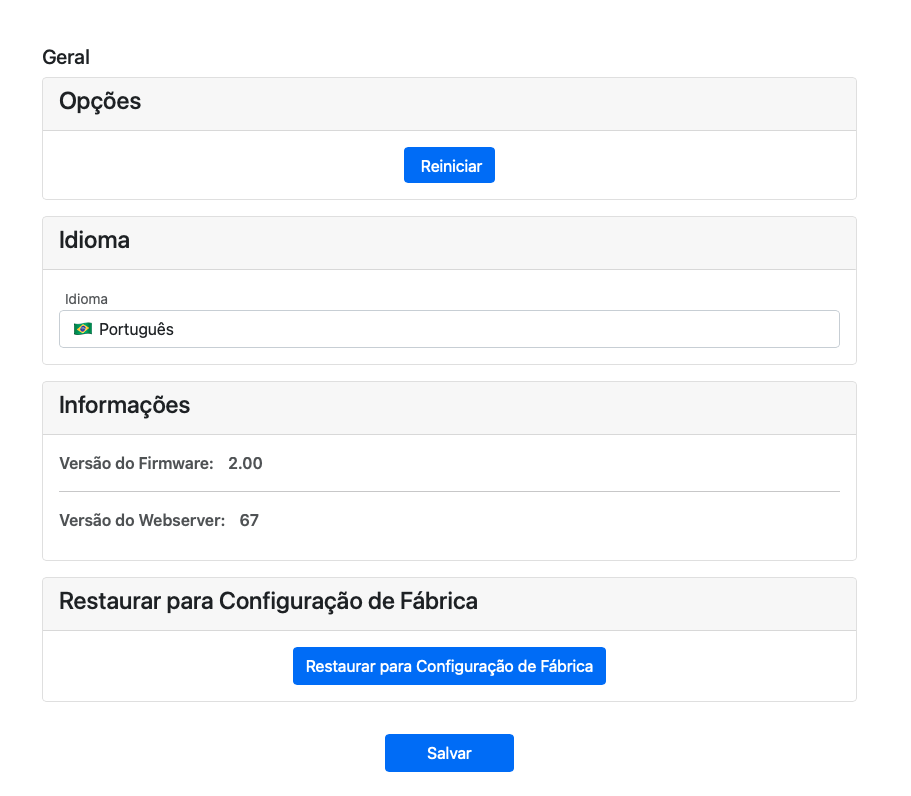
| Opção | Função |
|---|---|
| Reiniciar | Reinicia o conversor |
| Idioma | Português / Inglês |
| Restaurar Fábrica | Retorna às configurações originais |
⚠️ Restaurar o sistema apaga todas as configurações do usuário.
3.4 Salvando os dados
Após configurar cada seção, clique em “Salvar”.
Uma mensagem de sucesso será exibida no topo da página.
Reinicie o WS2C para aplicar as alterações.
⚠️ Para reiniciar o conversor, pressione rapidamente o botão físico de reset uma única vez.
Atenção: Não mantenha o botão pressionado por mais de 10 segundos, isso fará com que o conversor retorne às configurações de fábrica.
3.5 Status do Sistema
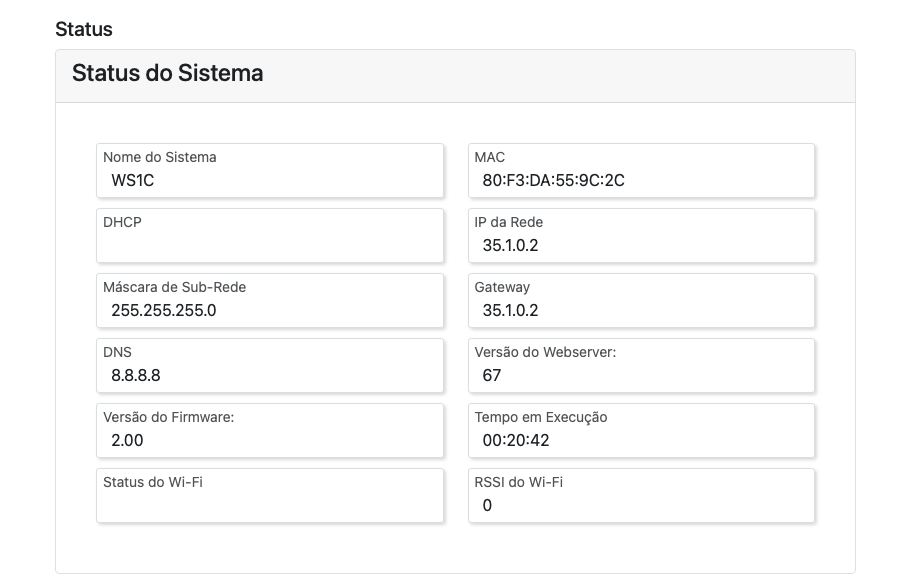
Exibe informações como:
| Parâmetro | Exemplo |
|---|---|
| Nome do Sistema | WS2C TGY |
| MAC | 70:B8:F6:5C:BE:BC |
| IP | 192.168.15.11 |
| Máscara | 255.255.255.0 |
| Versão Firmware | 1 |
| Versão Webserver | 1 |
RSSI (intensidade do sinal Wi-Fi)
| Valor (dBm) | Qualidade |
|---|---|
| 0 a -50 | Excelente |
| -51 a -60 | Boa |
| -61 a -70 | Aceitável |
| -71 a -80 | Fraca |
| -81 a -100 | Ruim |
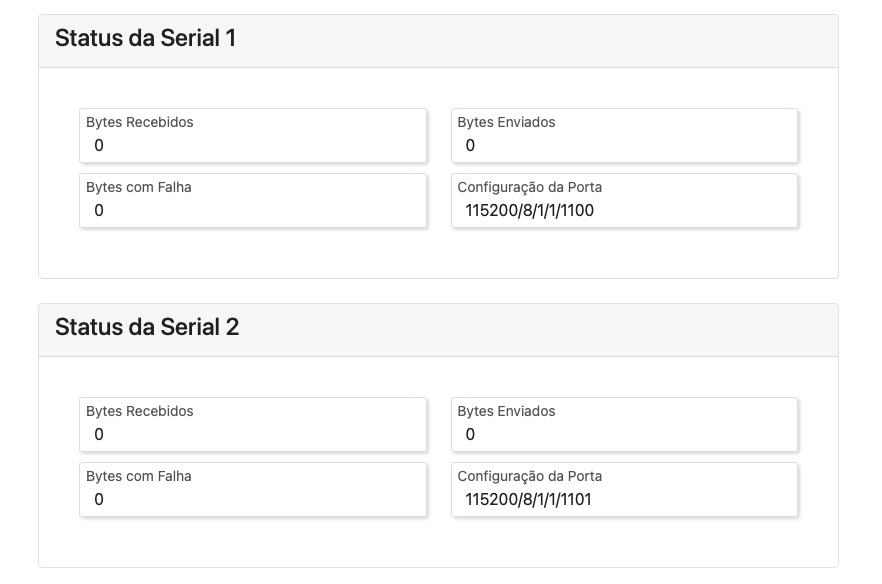
Também é exibido o total de bytes enviados e recebidos por cada porta serial pelo protocolo TCP/IP.
3.6 Protocolos

Nesta aba, é possível ativar ou desativar os protocolos de comunicação suportados pelo WS2C: TCP/IP, API (HTTP) e MQTT.
Para garantir maior estabilidade do sistema, recomenda-se habilitar apenas os protocolos realmente necessários. Por padrão, somente o protocolo TCP/IP vem ativado. O protocolo MQTT só pode ser habilitado se os protocolos TCP/IP e API estiverem ambos desativados.
4. Interface física do dispositivo
O WS2C possui:
2 portas seriais RS232 (DB9 macho) — pinos 2 (RXD), 3 (TXD) e 5 (GND)

1 botão multifunção
1 LED indicador
4.1 Botão
| Ação | Função |
|---|---|
| Pressionar rapidamente | Reinicia o sistema |
| Manter pressionado (10s) | Restaura configurações de fábrica |
4.2 LED Indicador
| Estado do LED | Significado |
|---|---|
| Piscando rápido (200ms) | Erro — requer reinicialização |
| Piscando lento (1s) | Operação normal |
| Piscando irregular | Atualizando sistema |
| Aceso fixo | Inicializando |
| Apagado | Desligado |
5. Firmware e Atualizações
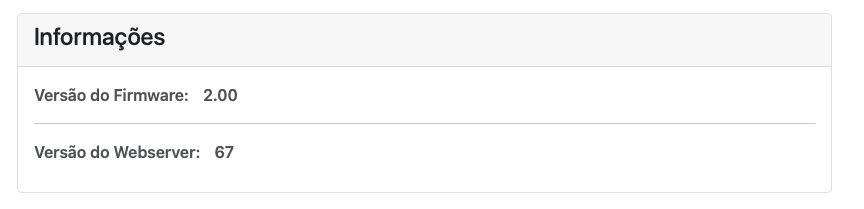
A versão do firmware pode ser verificadas na aba “Geral” do webserver.
Para atualizar o firmware, faça o download do atualizador para Windows disponível aqui. Em seguida, siga o passo a passo demonstrado no vídeo abaixo para garantir que a atualização ocorra sem problemas:
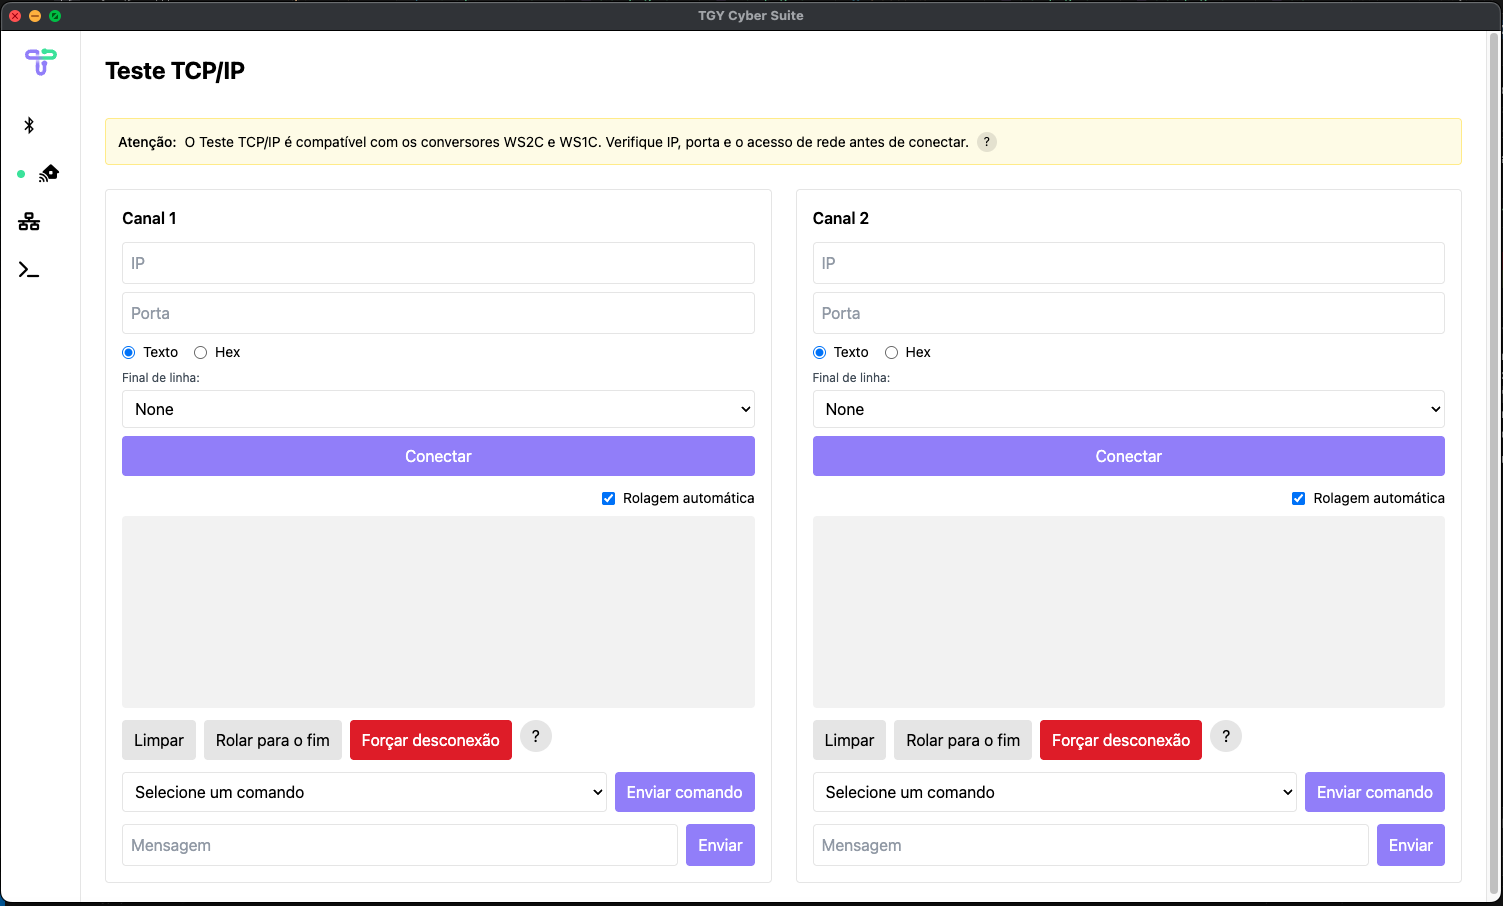
5.1 Software para Testes
O TGY Cyber Suite é um software recomendado para testar e validar a comunicação serial do WS2C.
Após realizar o download do software, você pode conferir como testar a comunicação assistindo ao vídeo abaixo:
Passos:
- No Software TGY Cyber Suite acesse a aba Teste TCP/IP
- Conecte ao WS2C um cabo loop igual demonstrado no vídeo.
- Insira o IP e a porta da serial.
- Clique em Conectar.
- Digite uma mensagem e envie.
- Se houver loopback entre pinos 2 (RX) e 3 (TX), o texto retornará no campo de recepção.
6. API - Application Programming Interface
O WS2C, a partir do firmware versão 1.1, disponibiliza uma API REST que facilita a integração com diversos sistemas e aplicações externas.
A ativação ou desativação da API pode ser realizada no menu de protocolos, conforme explicado na seção 3.6 deste manual.
Assista ao vídeo abaixo para ver na prática como utilizar a API:
⚠️ Todas as requisições exigem um token de autenticação (mínimo 6 dígitos).
6.1 Endpoint: /post-serial-data
Retorna os dados recebidos pela porta serial em formato JSON.
Exemplo de requisição:
URL:
POST http://192.168.15.130/post-serial-data
Cabeçalho:
Authorization: 123456
Corpo JSON:
{
  "port": 1100,
  "time": 2500,
  "command": ""
}
port: porta a ser escutadatime: tempo de escuta (ms)command: comando opcional a enviar antes da escuta
cURL:
curl -X POST http://192.168.15.130/post-serial-data \
  -H "Accept: application/json, text/plain, */*" \
  -H "Content-Type: application/json" \
  -H "Authorization: 123456" \
  -d '{"port":1100,"time":500,"command":"\u0005"}'
É possível validar o funcionamento da API com o software TGY Cyber Suite
⚠️ Recomenda-se tempo de escuta abaixo de 30 segundos para evitar bloqueios de outras funções.
7. MQTT - Message Queuing Telemetry Transport
A partir da versão 2.0 do firmware, o WS2C oferece suporte ao protocolo MQTT, proporcionando uma solução eficiente para integração em aplicações na nuvem e automação IoT. A configuração para habilitar ou desabilitar o MQTT pode ser realizada facilmente pelo menu de protocolos, conforme detalhado na seção 3.6 deste manual. Confira no vídeo abaixo uma demonstração prática de como utilizar o MQTT com seu WS2C: